Ad Inserter Review Summary
-
Effectiveness (Overall)
-
Ad Placement Flexibility/Options
-
Ease-of-Use
Summary
Overall rating.
User Review
( votes)
Would you like to save this?
Ad Inserter is the Adsense and other display ad management WordPress plugin I’m now using.
For a long time I used Quick Adsense, but very recently I switched to Ad Inserter.
After extensive testing, it’s proven to be an absolute gem for ad management.
Ad Inserter makes it so easy to automate ad placement in posts and pages sitewide and/or customize placement on a post-by-post and page-by-page basis.
Currently, I use Ad Inserter to manage all my Ezoic ad placeholders and it works perfectly. Read my Ezoic review to learn more about ad revenue via Ezoic.
User Interface (Backend)
Here’s a screenshot of the Ad Inserter interface and features:
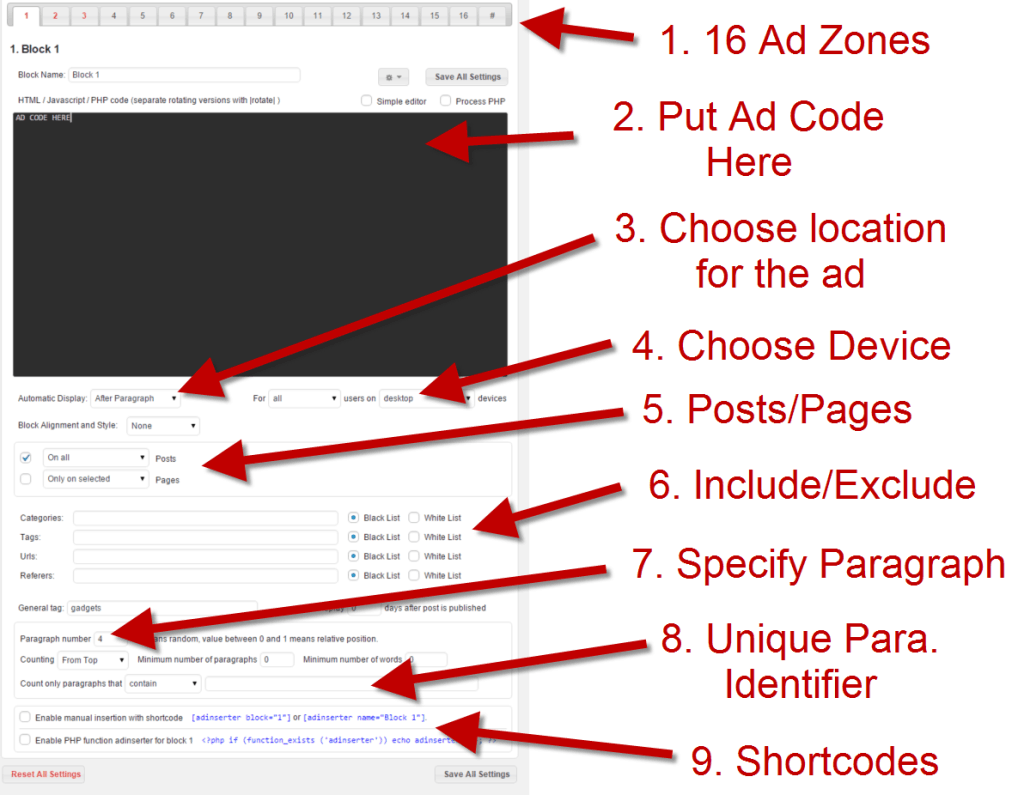
Automatic Display options (see arrow 3. Choose location for ad above”) include:
- None
- Before Title
- Before Content (places ad after title)
- Before Paragraph: Specify if ads should be placed before a specific paragraph. You can use this for placing ads before a specific image too (see the Ad Inserter tutorial below regarding placing ads before/after images in a post).
- After Paragraph: Specify ads after a specific paragraph.
- After Content: Places ads at the end of the content.
- Before Excerpt: This is awesome. You can place ads before a specified excerpt on category/archive pages.
- After Excerpt: Place ads after a specified excerpt on category/archive pages.
- Widget: Place ads in the Ad Inserter Widget.
Below are the 10 reasons I use this plugin to manage most of my ad placements throughout my niche sites.
Key Features
1. Place ads pretty much anywhere in a post and/or page (for all 16 zones)
This is by far the biggest reason I switched from Quick Adsense to Ad Inserter. While Quick Adsense offered some decent sitewide ad placement flexibility, it’s nothing like Ad Inserter.
Ad Inserter provides 16 zones. You can place an ad pretty much anywhere in a post or page with these zones.
IMPORTANT TIP: How do you place ads after or before specific images in a post?
For example, if you want to place an ad after the fourth image on every post with 5 or more images, how is this done with Ad Inserter.
At first glance, it appears Ad Inserter doesn’t offer the ability to place ads sitewide after a specific image on each post. After all, there isn’t an option for placement “after image” like Quick Adsense offered.
Screenshot: How to insert ads automatically after or before specific images in posts:
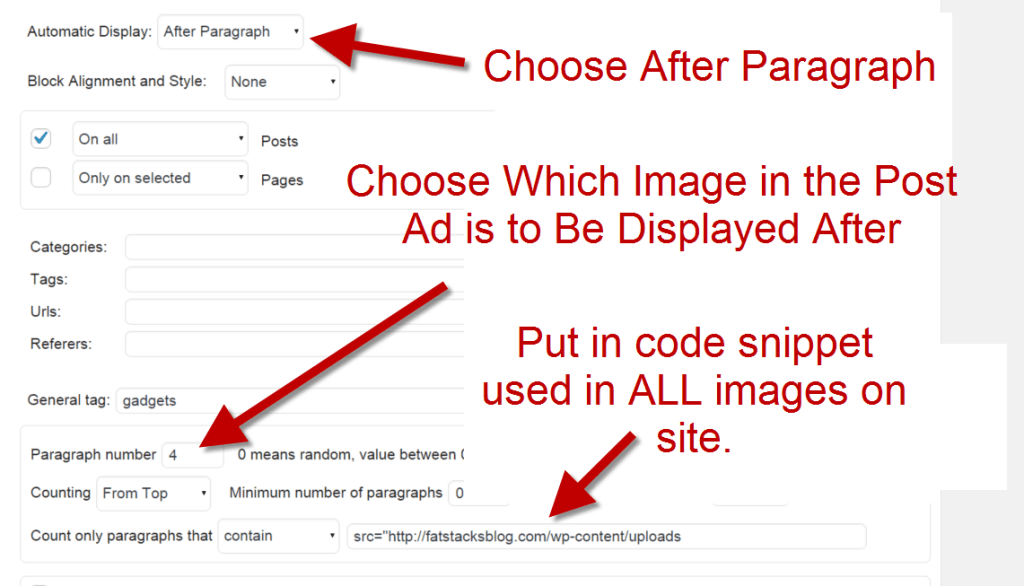
FYI, if you prefer to format it so ads are instructed to display before a certain image, choose “Before Paragraph” instead of “After Paragraph”. What’s the difference? If you have text in between images, you may wish the ad to display either directly below an image (in which case you choose “After Paragraph”) or directly above an image (in which case choose “Before Paragraph”).
Also, if you simply wish to place ads after or before text paragraphs, leave the “Count only paragraphs that contain” field empty.
The thing to note is that an image is considered a paragraph.
Therefore, I identify code that’s in every image code on my site. For my big sites it’s a snippet of the image uploads to my Amazon buckets. For sites where I upload images to my hosting account it’s something like “src=”https://fatstacksblog.com/wp-content/uploads” (don’t include the “”). Because every image uploaded to the site has the same string of code, I can use that as an identifier in the paragraph.
I then choose to place the ad “After Paragraph” and input “5”. Ad Inserter then offers the option to specify paragraphs that “contain” or “not contain” whatever you want. In this case I select “contain” and input the universal snippet of code found in all of my images.
What this does is place the ad for that zone after image number 5.
What makes Ad Inserter so great is all 16 zones has this flexibility which means have full control over ad placement throughout the site.
2. Category/Archive page ad management
Ad Inserter provides amazing flexibility for placing ads on category/archive pages. Obviously ad placement will differ on archive pages than regular posts.
Ad Inserter provides this control by offering options to place ads after or before any excerpt on the page. Talk about awesome.
3. It’s continually updated
Quick Adsense plugin hasn’t been updated in over 2 years according to Wordpress.org. That always made me a bit nervous, but despite that the plugin worked fine.
Ad Inserter, on the other hand, is continually updated. For example, Ad Inserter was updated 1 month before this post was published.
4. Shortcode capability
Sometimes a post or page requires unique ad placement compared to other posts and pages. This is where shortcodes come in handy.
Ad Inserter offers full shortcode functionality so you can input any ads you have in any zones manually in any place on a post or page.
5. Control ad placement by device (i.e. mobile vs. tablet vs. desktop)
I don’t place mobile ads in the same places as I do tablet and desktop.
FYI, Google Adsense does not permit 2 Adsense ads to display on a mobile screen at the same time. Also, you cannot have an Adsense rectangle banner (300×250) at the top of a post on mobile.
This means in some cases, you will want to have unique ad placement for each type of device. I do this and it makes a huge difference.
Ad Inserter gives you device control. You can dictate for every ad zone whether it shows up on all devices, phone only, tablet only, desktop only, desktop and tablet… you get the picture.
As an aside, I also use the free plugin WP Mobile Detect for controlling ads and content across different devices. It’s a very, very good plugin. For a full list of WP mobile Detect shortcodes, click here.
6. Exclude/include by category, tag, traffic sources and/or individual URLs.
Sometimes you may wish to exclude or include ad placement by category, tag, traffic source and/or individual URLs. Ad Inserter makes this possible.
For example, if you offer a category of product reviews that you monetize with affiliate promotions and you don’t want ads on those posts, you can exclude ads on all posts in that category. Again, another very useful tool.
7. Full ad management interface on individual posts and pages for full control.
The Ad Inserter interface is available on the editor for every page and post. This way you have control over ad placement on a post-by-post basis.
8. Specify alignment
You can specify whether ads are left aligned, centered or right aligned.
9. Turn ads on/off for logged in users
This can be very handy if you let people create an account on your site and you wish to not show ads to them.
10. It’s free.
I still can’t believe it’s free because it’s incredibly good for ad management.
How to exclude Ad Inserter ads on Woocommerce product pages
On one of my niche sites I’m using the Woocommerce plugin. On my Woocommerce product pages, I don’t want ads to display.
Unfortunately, there isn’t a control mechanism for this in the Ad Inserter interface.
I’m not the only person who had this issue. The plugin author posted a simple coding solution here.
Just clarify on what the plugin author said, place the code he provides in the relevant Ad Inserter zone.
Ad Inserter makes ad testing super easy
Because I can quickly change ad placement sitewide with such a high level of customization, I can test endless number of ad configurations. I love this capability. It’s helped me continually improve ad revenue from both Adsense and Media.net.
Does Ad Inserter work with Ezoic Ad Tags?
Yes. In January 2016 I started testing Ezoic again to increase ad revenue. I use Ad Inserter to place all ad tags. Read exactly how I set up Ezoic here. Learn more about Ezoic here.
How to install Ad Inserter
It’s installed just like any other plugin. Simply upload it and activate it.
It’s found in the Settings menu.
Download it here (I just access it from the plugins interface in the backend of my WordPress).
=> Don’t forget to get my free report on ad placement that generates very good ad revenue for me. Click here for the free report.

Jon Dykstra is a six figure niche site creator with 10+ years of experience. His willingness to openly share his wins and losses in the email newsletter he publishes has made him a go-to source of guidance and motivation for many. His popular “Niche site profits” course has helped thousands follow his footsteps in creating simple niche sites that earn big.


Hi! Thanks for the tutorial. I’m here to know how to add ads code to the sidebar. I have checked the plugin several time and I couldn’t find out. Please tell me how to add ads code to the sidebar of my website.
But where do you get the Ad Code to put in the boxes?? Nobody seems to cover this and I’m sorry, but I’m lost. Please help!
The ad code is provided by your ad network. For example, once you create ads with AdSense, you are provided a code snippet that you then copy and paste into the AdInserter boxes.